


 Because we single ladies can nail a solo Valentine's Day.

Showing posts with label Diy. Show all posts
Showing posts with label Diy. Show all posts
Sunday, February 14, 2016
20 Anti-Valentine's Day Nail Art Ideas (PHOTOS)
Because we single ladies can nail a solo Valentine's Day.How to Make Cheap Flowers Look Expensive
Sometimes it seems like men run towards the flower stall, close their eyes, and TheBouqs.com, is here to tell you how to turn your grab-bag blooms into fancy-looking flowers.

Tuesday, February 2, 2016
5 IDEAS TO STEAL FROM 5 COMPACT LIVING ROOMS
We scoured Pinterest for five easy to do tricks that you can do at home
 Here's the dilemma of homeowners: they love inviting friends over but they don't know how to fit everyone inside a small living space. While some can stay in the balcony and dining area, there are guests who simply want to relax and get comfy in the (small) living room. Don't panic! You can turn a limited space into an inviting corner—so inviting, that your guests will surely want to stay there for good!
Transform your living area with the help of these well-maximized spaces as pegs:
Sunday, January 31, 2016

Thursday, December 24, 2015
Festive DIY Manis For The Holidays
21 Festive DIY Manis For The Holidays
'Tis the season for decorating! Everything from your car, to your tree, to your mantel, and of course your nails - it all has to be decked out in the holiday spirit with a touch of glitz and glamour, and maybe even a dash of red and green. There's no better way to get in the Christmas spirit than to transform your manicure into something even Mrs. Claus would be jealous of! So go grab your nail polish and get the Christmas season started with these 21 festive DIY manis for the holidays.
Tuesday, September 8, 2015
10 Beauty Hacks That Will Change Your Life
If you've been having trouble getting the most vibrant color out of your eyeshadow, you are not alone. To really make your eyeshadow pop, especially if it's a vibrant color, then you should first white eyeliner on your eyelids.
Sunday, August 30, 2015

DIY Dry Apple Wreath

This amazing fall wreath looks so that it would make you think of food – of amazing fall gift like these ripe apples. For this apple wreath you’ll need a 14″ grapevine wreath, 3 red apples, a mandolin slicer, lemon juice, a dehydrator, a hot glue gun, acorns & star anise, a burlap bow. Cut apple slices keeping skin and immediately place them to the side and dip/brush in lemon juice to prevent browning. Add to dehydrator for 5-6 hours at the highest temperature. After the slices are ready, arrange and hot glue them. Add acorns and star anise. Let everybody enjoy your unusual and tasty-looking wreath!
Source: lmichellek


Friday, August 21, 2015


DIY iPhone Case With Your Favorite Picture
Making your own iPhone Case with your style is fun and cool especially if its easy to make so today i m gonna be showing you how me one with simple ways. all you gotta do is to follow with me :)


Thursday, August 6, 2015
HOMEWORK CADDY
this is one of my favorite diy ever the homework caddy from old boxes i mean who doesn't have it you can use food boxes like dried milk , cereals ,toilets paper cartoons ,cookies cartoons and so many that we throw every day.


What we need
- 3-5 Empty cardboard cartons (leftover cereal, pasta, and granola bar boxes seem to work just great)
- Duck Tape
- Scissors
- Cardboard tubes (optional)
INSTRUCTIONS
- Place your cardboard cartons side by side then tape the bottoms together. For this first step, you may find it helpful to employ a second pair of hands (one person to hold, one person to tape).
- Trim the tops of the boxes off to the desired heights.
- Keep wrapping the tape over and around the surface of the boxes and just inside the rim. You may wish to use a credit card or the back of a spoon to make sure the tape gets into every corner.
- To convert the front pocket into a market caddy, insert a few empty cardboard tubes trimmed to size. They will keep pens and pencils standing upright and accessible!
TIPS
- Here I worked in stripes, but you may find it easier to work in an abstract ‘paper-mache’ style.
- Surface wrinkles are part of the fun, but you will find them easy to disguise by choosing a patterned duck tape.

Fashion Bracelets
before i start i wanna ask you guys a question,if you saw this but you don't know yet that it's a DIY how much do you think they sale it ?
 i would say wow how expensive is that but the fact that i made it at home it makes me what sale it online tbh .

 Center the 30 inch cord under the two middle strands. Fold the right cord over the middle strands and under the left cord. Pull the left cord under the right and middle strands and through the loop on the right side.
 then Pull tightly and slide the knot up to the top.


 To make a sliding closure, shape the bracelet into a circle and overlap the middle strands. Use scraps to temporarily tie the cords together at each end.

 The two sets of middle strands are now the adjustable ties of the bracelet. Adjust to fit the wrist and tie each end into knots. Trim away any excess.

i would say wow how expensive is that but the fact that i made it at home it makes me what sale it online tbh .
because when i look at the i think about the word fashion , yes fashion but now i'll show you how to make your own fashion ;)
follow with me :
You'll need:
- 4 yards of 0.5mm chinese knotting cord
- a connector or charm
- an embroidery needle
- a pair of scissors
- flat nose pliers (optional)
- a lighter (optional)
once you get all what you need Start by cutting the knotting cord into two 30 inch, two 20 inch and one 10 inch lengths. Fold the 20 inch piece in half, pull the loop through the ring, fold it over the ring, and pull the rest of the cord through the loop. Repeat the step on the other side of the ring. These strands will be anchored and remain stationary.
Center the 30 inch cord under the two middle strands. Fold the right cord over the middle strands and under the left cord. Pull the left cord under the right and middle strands and through the loop on the right side.then Pull tightly and slide the knot up to the top.
Finish the 2nd half of the square knot by folding the left cord over the middle strands and under the right cord. Pull the right cord under the left and middle strands and through the loop on the left side.
Pull tightly and repeat the steps – left, right, left, right . . . Continue knotting until the desired length is reached. Keep in mind that the clasp will take up approximately half an inch.
To finish the knots, thread one of the cords onto a needle and sew up the center of 3-4 knots along the backside. Pliers will help pull the needle through the tight knots.

After sewing up both knotting cords, trim away any excess. Save the scraps and melt the tips with a lighter to seal it for extra hold. Repeat the same exact step on the second half of the bracelet.
To make a sliding closure, shape the bracelet into a circle and overlap the middle strands. Use scraps to temporarily tie the cords together at each end.
Take the 10 inch cord and center it under the strands. Start tying square knots exactly the same way the bracelet was executed.
Stop at about half an inch and sew the knotting cords into the backside of the closure. Remove the temporary ties.
The two sets of middle strands are now the adjustable ties of the bracelet. Adjust to fit the wrist and tie each end into knots. Trim away any excess.
and here is your bracelet nice and done you can use any color and its doesn't have to be a circlet you can use anything you have and anything you want i hope you enjoy it please follow our blog for more
DIY School NoteBook
school starts next month some of you have already started it so i came up with new ideas about DIYs and i have such a girly NoteBook to make for being a special around your friends.
i didn't want to talk too much so i made all the instructions in a picture i know you guys love pictures o.O I DO TOO HAHAH

i didn't want to talk too much so i made all the instructions in a picture i know you guys love pictures o.O I DO TOO HAHAH
Back to school
school is soon and i have for you loads of unique DIY that your friends will be asking where did you get them ;)

get ready guys cuz today our DIY school back is opened
Saturday, August 1, 2015


Thursday, July 23, 2015
New DIY Room

join me on my DIY Category , sing up for every new this summer ;)
DIY For summer ♥ Shirts
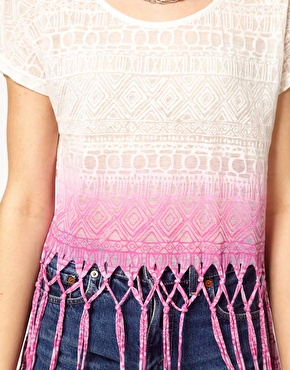
Hey guys and today i came up with this new Diy of summer shirts which is so great for beach say or summer vacation.
 its so easy and fun and now ill explain to you how to make it , follow with me :
- first you will need a shirt of course , old one or a shirt that you don't need..it's up to you.
- second step cut the end of your shirt into slices cut it as much as you want (cut it up to the middle it's up to you if you want it short or medium)
- third wrap the shirt slices together it seems hard but its not.you will just need to wrap each side by other and you hard wraps at the end of every single side when you done so it won't get missy and fall off all those beautiful wraps .
- last step is to cut the ends of the shirt that still after you wrapped them or you just can leave them if you want its also looks so beautiful.
other options :
you can leave your shirt cut without wrap it.this won't ruin it look at this example if you wanna do the same as it.
Or you can wrap just the half of it if you want to, or if you have another way of wrapping cut shirt that would be fun to try it you can also share them with me ..i gave you guys another example about the half wrapped shirt if you would like to try it .
and i have another style for you it's all down below i hope you like them.
and my last option is that you can add accessory to your shirt..yeah it's possible see them on Add accessories to my shirt?

Subscribe to:
Posts (Atom)
.
